Image-to-Image (img2img) Generation
Transform existing images using diffusion models with text guidance in Transformer Lab.
Overview
Image-to-image processing allows you to modify existing images using text prompts while preserving the original structure and composition. This powerful feature enables creative transformations, style transfers, and artistic modifications using the same intuitive interface as text-to-image generation.
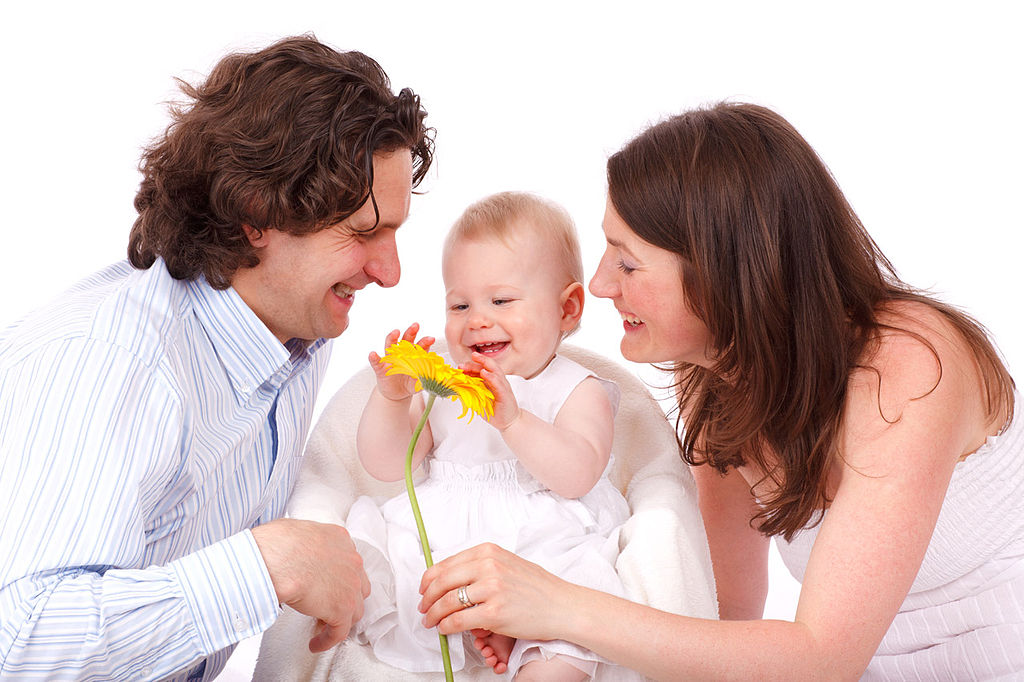
For example:
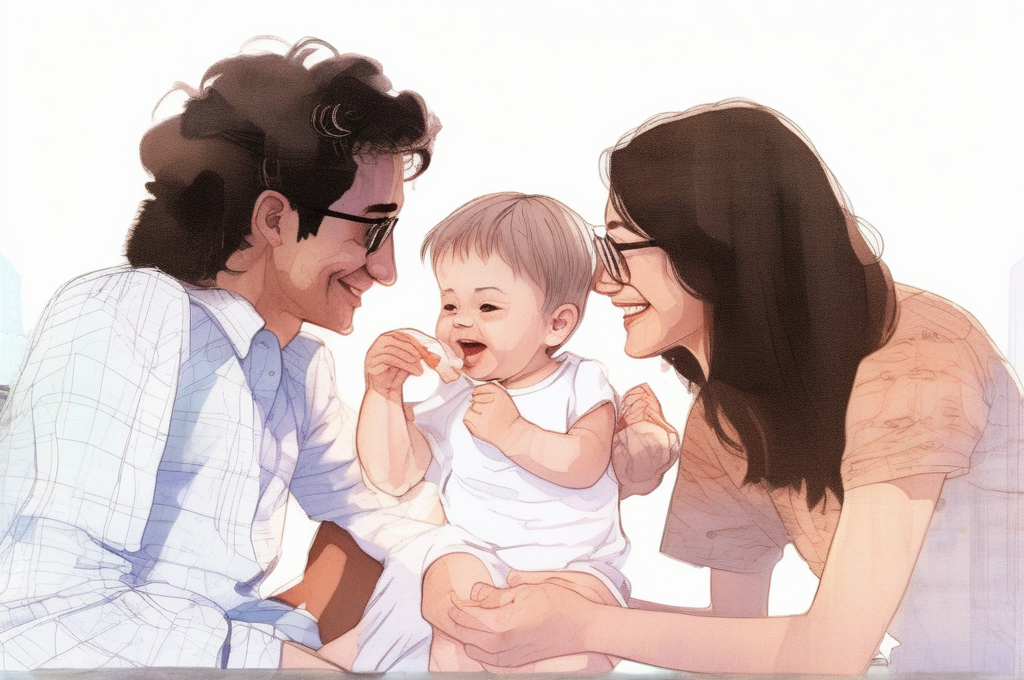
Can turn to:
Getting Started
Prerequisites
- Downloaded diffusion model (see Downloading Models)
- Source image to transform (either uploaded or from generation history)
- Clear text prompt describing desired changes
- NVIDIA or AMD GPU with sufficient GPU memory for inference
Accessing Image-to-Image Processing
- Select a diffusion model from the Foundation tab
- Navigate to the Diffusion tab (appears in place of the Interact tab when a supported diffusion model is selected)
- Verify your model selection - you'll see the selected model displayed along with any adaptor if one was selected on the Foundation screen
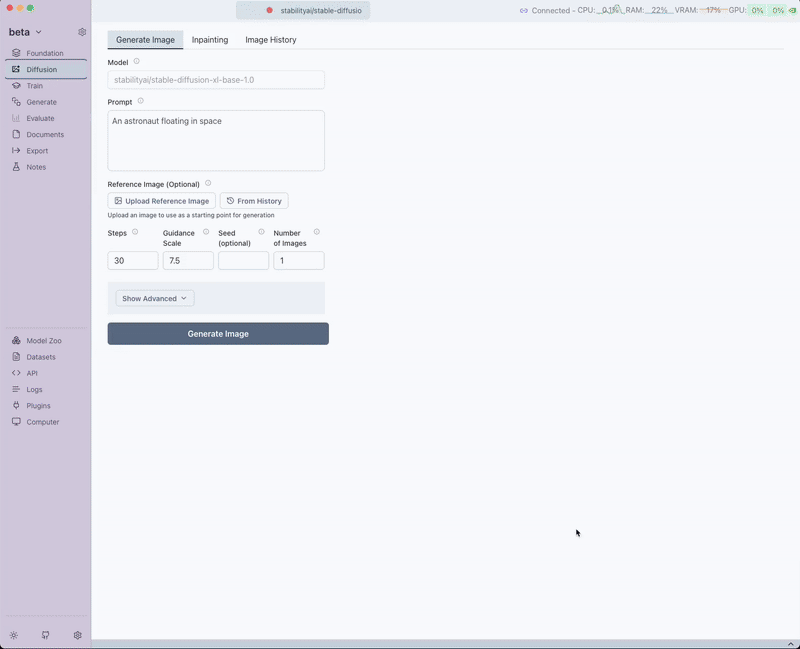
- Upload or select a reference image and configure generation parameters
Interface Overview
Main Generation Controls
The Transformer Lab image-to-image interface shares the same intuitive controls as text-to-image generation, with the addition of reference image functionality:
Reference Image
The key difference for image-to-image processing is the reference image input:
- Upload Image: Click to upload an image file from your computer
- Select from History: Use previously generated images as reference by selecting from your generation history
Prompt
Give a full description of the new image, as if you were generating from scratch.
A happy family of three. Mom, dad and baby. They each have a relaxed, stylish vibe, wearing 90s-inspired casual outfits including graphic tees, jeans, sneakers, and sunglasses. The overall scene is drawn in a soft anime or watercolor style, with warm tones and natural lighting. Studio Ghibli inspo. The setting feels nostalgic and urban, giving off a vintage band poster or indie movie still kind of energy.
Steps
Number of denoising steps. More steps generally produce higher quality images but take longer to generate. Typical values range from 20-50.
Guidance Scale
Controls how closely the model follows your prompt. Higher values (7-15) follow the prompt more strictly, lower values (1-7) allow more creative interpretation.
Seed
Random seed for reproducibility. Leave empty for random generation, or use a specific number to generate the same transformation repeatedly.
Number of Images
Number of images to generate in parallel. Higher values will take longer but produce more transformation options to choose from.
Advanced Controls
The advanced menu provides additional fine-tuning options:
Negative Prompt
Describe what you don't want to see in the transformed image. This helps guide the model away from unwanted elements, styles, or features.
blurry, low quality, distorted, oversaturated, artifacts
ETA
Controls the amount of noise in the denoising process. Higher values add more randomness while lower values make the process more deterministic. Leave at 0.0 for default behavior.
Clip Skip
Number of CLIP text encoder layers to skip. Higher values may result in more artistic or abstract outputs. Set to 0 for default behavior.
Guidance Rescale
Rescales the guidance scale to prevent over-saturation. Values between 0.0-1.0 can help balance prompt adherence with image quality. Leave at 0.0 for default behavior.
Image Width
Set a custom width for the generated image in pixels. Leave at 0 to use the model's default width. Values should be multiples of 8.
Image Height
Set a custom height for the generated image in pixels. Leave at 0 to use the model's default height. Values should be multiples of 8.
Upscale Image
Enhance the generated image resolution by upscaling it 2x using an upscaling model. This improves detail and clarity, especially for low-resolution outputs.
Best Practices
Reference Image Selection
- Use high-quality source images: Clear, well-lit images produce better transformation results
- Consider composition: Simple compositions often transform more successfully
- Match aspect ratios: Use images with appropriate dimensions for your desired output
- Leverage generation history: Previously generated images often work well as reference inputs
Environmental Changes:
Change this sunny day scene to a dramatic stormy evening with dark clouds and lightning
Parameter Optimization
- Start with defaults: Begin with standard settings and adjust based on results
- Experiment with steps: Try 20-30 steps for faster results, 40-50 for higher quality
- Adjust guidance scale: Use 7-10 for balanced results, higher for strict prompt following
- Use negative prompts: Always specify what you don't want to avoid common issues
- Test different approaches: Try various prompt styles and parameter combinations
Performance Considerations
- Monitor GPU memory: Reduce image dimensions or number of images if memory is limited
- Balance quality vs speed: More steps and higher resolution increase generation time
- Use upscaling wisely: Enable upscaling for final images rather than during experimentation
- Batch processing: Transform multiple images with consistent settings for efficiency
Saving Generated Images
Save All Images Feature
Once you've generated transformed images, you can easily save them to your local system:
- Save All Images button: Located below the generated images, this button allows you to download all transformed images at once
- Convenient batch saving: No need to save images individually - get all your transformation results in one action
- Organized downloads: Images are saved with descriptive names for easy identification
This feature is particularly useful when generating multiple transformation variations, allowing you to quickly save all results for comparison or further use.
Troubleshooting
Common Issues
- Transformation too subtle: Increase guidance scale or use more specific prompts
- Transformation too dramatic: Lower guidance scale or use more conservative prompts
- Poor image quality: Increase steps, adjust guidance scale, or improve prompt details
- Reference image not loading: Check file format (JPG, PNG recommended) and file size
- Slow generation times: Reduce steps, image resolution, or number of images
- Out of memory errors: Reduce image dimensions, lower number of images, or use smaller models
- Unwanted artifacts: Use negative prompts to exclude specific features or styles
Solutions and Tips
- Image quality optimization: Use high-quality reference images and detailed prompts
- Memory optimization: Use image dimensions that are multiples of 8 for best performance
- Consistency improvement: Use the same seed value to reproduce successful transformations
- Speed optimization: Use fewer steps during experimentation, more for final generation
- History management: Organize your generation history for easy reference image selection
Next Steps
Explore other diffusion capabilities: